

Using HashiCorp Vault to Automate certificate lifecycle management F5 BIG-IP


As an F5 consultant for many years, I have encountered numerous instances where clients neglected to monitor their various certificates and ensure the validity of their critical applications deployed across multi-cloud and on-premises environments.
I have compiled a concise guide on how to use HashiCorp Vault for automating certificate lifecycle management on your F5 BIG-IP devices.
Benefits of Vault automation for BIG-IP
No application downtime — Dynamically update configuration without affecting traffic
Multi-Cloud and On-prem independent solution for your application anywhere
Improve security posture with short lived dynamic certificates
Increased collaborating breaking down silos
Uses Vault Agent and Leverages AS3 Templating to update expiring certificates
Components
Let’s discuss what is needed to make this successful.
BIGIP F5 deployed with AS3
“Application Services 3 Extension (referred to as AS3 Extension or more often simply AS3) is a flexible, low-overhead mechanism for managing application-specific configurations on a BIG-IP system. AS3 uses a declarative model, meaning you provide a JSON declaration rather than a set of imperative commands. The declaration represents the configuration which AS3 is responsible for creating on a BIG-IP system. AS3 is well-defined according to the rules of JSON Schema, and declarations validate according to JSON Schema. AS3 accepts declaration updates via REST (push), reference (pull), or CLI (flat file editing)” — from here
To learn more about F5 AS3 click here
HashiCorp Vault
“Vault is an identity-based secrets and encryption management system. A secret is anything that you want to tightly control access to, such as API encryption keys, passwords, or certificates. Vault provides encryption services that are gated by authentication and authorization methods. Using Vault’s UI, CLI, or HTTP API, access to secrets and other sensitive data can be securely stored and managed, tightly controlled (restricted), and auditable. “ — from here
Vault PKI Secret Engine
“The PKI secrets engine generates dynamic X.509 certificates. With this secrets engine, services can get certificates without going through the usual manual process of generating a private key and CSR, submitting to a CA, and waiting for a verification and signing process to complete. Vault’s built-in authentication and authorization mechanisms provide the verification functionality.” — from here
Vault Agent
Vault Agent is a client daemon that provides the following features to manage the certificate life cycle. Auto-Auth — Automatically authenticate to Vault and manage the token renewal process for locally-retrieved dynamic secrets.

Lab and Configuration
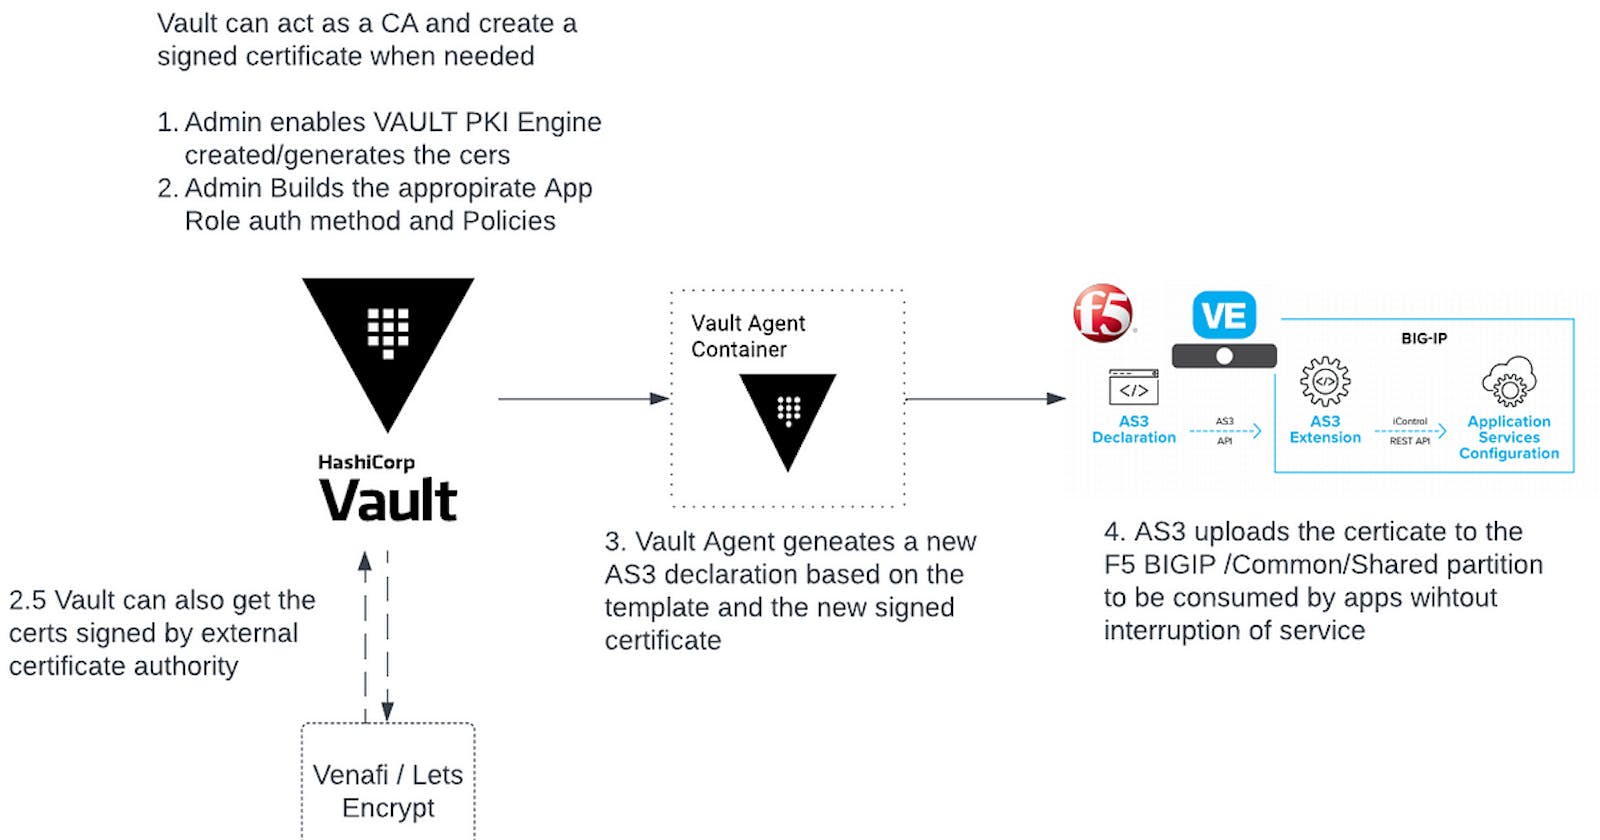
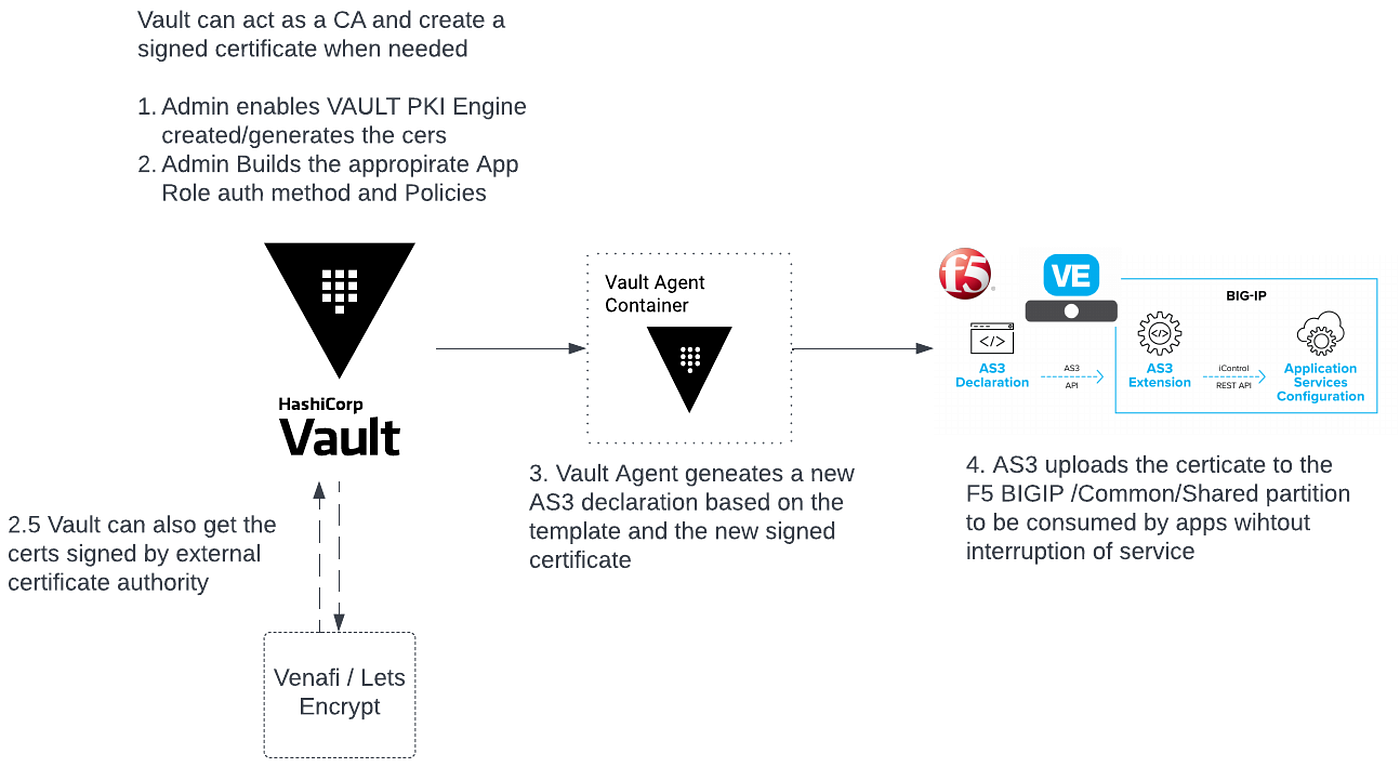
The following diagram outlines the workflow of Vault and automatically updating certificates on F5.
In this tutorial,
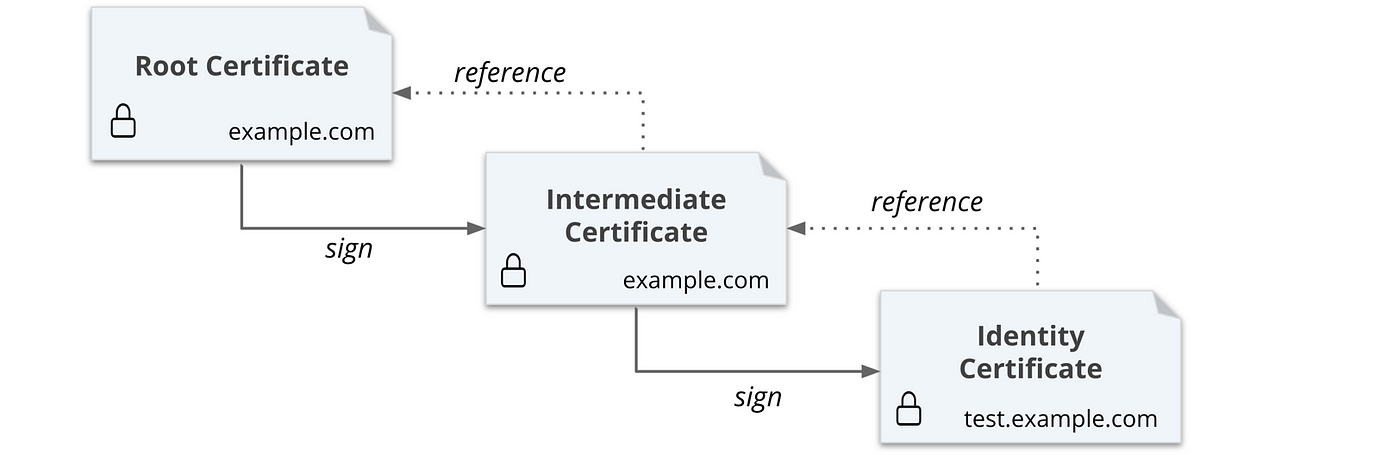
Going to first generate a self-signed root certificate.
Then you are going to generate an intermediate certificate that is signed by the root.
Next, you are going to generate a certificate for the
test.example.comdomain.Configure Vault
Deploy Vault Agent
Setting up Vault
Setup Vault in your lab.
- Start Vault in a new terminal
vault server -dev -dev-root-token-id root
2. Export an environment variable for the vault CLI to address the Vault server.
export VAULT_ADDR=http://127.0.0.1:8200
3. Export an environment variable for the vault CLI to authenticate with the Vault server.
export VAULT_TOKEN=root
Configure Vault
# Configure PKI Engine
vault secrets enable pki
vault secrets tune -max-lease-ttl=87600h pki# Generate root CAvault write -field=certificate pki/root/generate/internal \
     common_name="example.com" \
     ttl=87600h > CA_cert.crt# Configure the CA and CRL URLvault write pki/config/urls \
     issuing_certificates="$VAULT_ADDR/v1/pki/ca" \
     crl_distribution_points="$VAULT_ADDR/v1/pki/crl"# Generate intermediate CAvault secrets enable -path=pki_int pki
vault secrets tune -max-lease-ttl=43800h pki_int# Execute the following command to generate an intermediate and save the CSR as pki_intermediate.csrvault write -format=json pki_int/intermediate/generate/internal \
     common_name="example.com Intermediate Authority" \
     | jq -r '.data.csr' > pki_intermediate.csr# Sign the intermediate certificate with the root CA private key, and save the generated certificate as intermediate.cert.pem.vault write -format=json pki/root/sign-intermediate csr=@pki_intermediate.csr \
     format=pem_bundle ttl="43800h" \
     | jq -r '.data.certificate' > intermediate.cert.pem# Once the CSR is signed and the root CA returns a certificate, it can be imported back into Vault.vault write pki_int/intermediate/set-signed certificate=@intermediate.cert.pem
Create a role
Create a role named example-dot-com which allows subdomains.
vault write pki_int/roles/example-dot-com \
 allowed_domains=”example.com” \
 allow_subdomains=true \
 ttls="10m" \
 max_ttl=”30m”
Build a Policy and Configure Auth method
Next we are going to build a policy and auth method (approle) for our Vault-agent.
Here is the following policy i used cert-policy
# Permits token creation
path "auth/token/create" {
  capabilities = ["update"]
}# Permits token renew
path "auth/token/renew" {
  capabilities = ["update"]
}# Read-only permission on secret/
path "secret/data/*" {
  capabilities = ["read"]
}# Enable secrets engine
path "sys/mounts/*" {
  capabilities = [ "create", "read", "update", "delete", "list" ]
}
# List enabled secrets engine
path "sys/mounts" {
  capabilities = [ "read", "list" ]
}
# Work with pki secrets engine
path "pki*" {
  capabilities = [ "create", "read", "update", "delete", "list", "sudo" ]
}
Lets enable approle and deploy the policy
vault auth enable approle
vault policy write cert-policy cert-policy.hcl
vault write auth/approle/role/web-certs policies="cert-policy"
Build Vault Agent
Next let’s build a vault agent on your machine. I build it on my shared server in ubuntu. here is a link to help you built this
Note: Ill add docker vault agent build and securing vault agent in the future
Now that you have vault installed on your machine let’s get the connect to vault and grab the roleID and SecretID by executing the following command
vault read -format=json auth/approle/role/web-certs/role-id | jq -r '.data.role_id' > roleID
vault write -f -format=json auth/approle/role/web-certs/secret-id | jq -r '.data.secret_id' > secretID
Next step is to build your vault agent config agent-config.hcl .. you can find all the code here — https://github.com/maniak-academy/vault-f5-certificate-rotate
pid_file = "./pidfile"vault {
   address = "http://192.168.86.69:8200"
}auto_auth {
   method "approle" {
       mount_path = "auth/approle"
       config = {
           role_id_file_path = "roleID"
           secret_id_file_path = "secretID"
           remove_secret_id_file_after_reading = false
       }
   }sink "file" {
       config = {
           path = "approleToken"
       }
   }
}template {
  source      = "./certs.ctmpl"
  destination = "./certs.json"
  command = "bash f5-magic.sh"
}template {
    source = "./certmanagement.tmpl"
    destination = "./certmanagement.json"
}
Note the f5-magic.sh is performing a call towards a specific F5 BIGIP to publish the configuration to a /Common/Shared partition allowing an organization to manage certificates.
#!/bin/bashcurl -X POST --silent --insecure -u admin:W3lcome098! -H 'Content-Type: application/json' -d @certmanagement.json https://192.168.86.33/mgmt/shared/appsvcs/declare | jq
Run Vault
Final step is to execute the Vault agent to run
vault agent -config=agent-config.hcl -log-level=debug
Here is the final output of vault agent automating the certificate lifecycle.
