

Automating application delivery with Consul-(NIA) Network Infrastructure Automation with F5 BIG-IP


The following guide/demo will automate your F5 VIP configurations based on the services registered in the Consul Service Catalog. When a team wants to deploy a secure web app or load balance a new API, they can simply register the services with Consul, providing the desired metadata, and automatically configure the F5 BIG-IP load balancer.
To get started let’s quick discuss why …Gartner has put out there top Top technology trends of 2022 https://www.gartner.com/en/information-technology/insights/top-technology-trends
Trend 7: Hyperautomation
Hyperautomation is a disciplined, business-driven approach to rapidly identify, vet and automate as many business and IT processes as possible.
Hyperautomation enables scalability, remote operation and business model disruption.
The Architecture
The achieve “hyperautomation” or “event-driven architecture” we need to ensure we have the automation and orchestration tools and services setup first. Let’s take a look at our environments.

Let’s go over all the components required to Hyperautomation.
Consul Enterprise
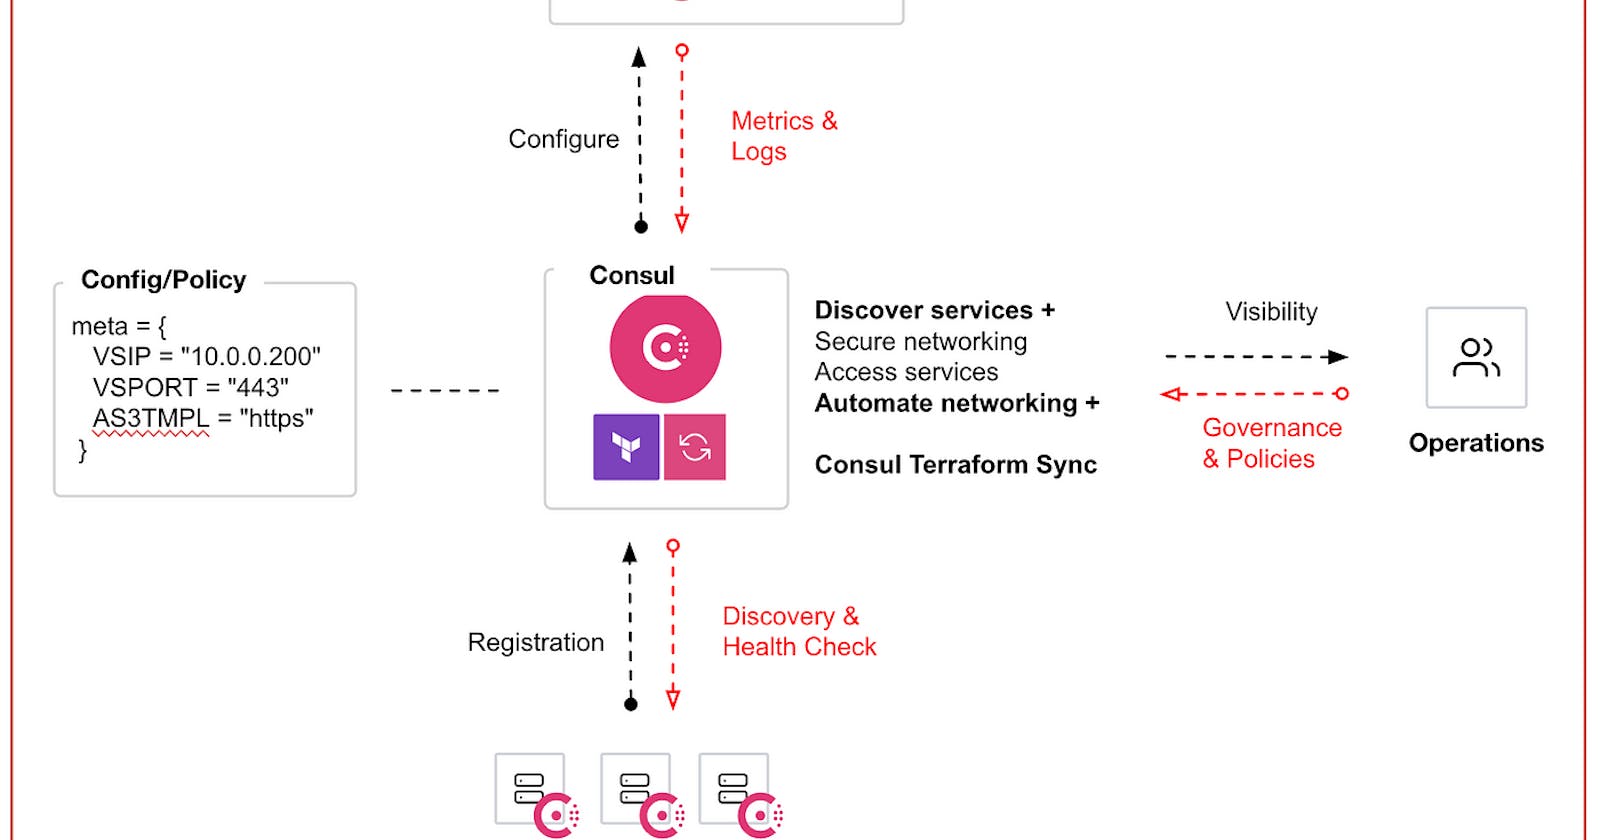
Consul is a tool designed to help organizations discover and securely connect any service, in any environment.
Consul leverages service names instead of IPs to support dynamic networking. Services can be discovered, connected, and secured through traditional means, like DNS, or more advanced architectures, like service mesh. Consul also provides real time health data of services and captures telemetry metrics that can be exported to third-party APM tools for a better understanding of network performance and identifying any potential breaking points.
For us to be successful in deploying a full scale F5 Automation event-driven/Hyperautomation architecture we need to have the following Pillars of service networking.
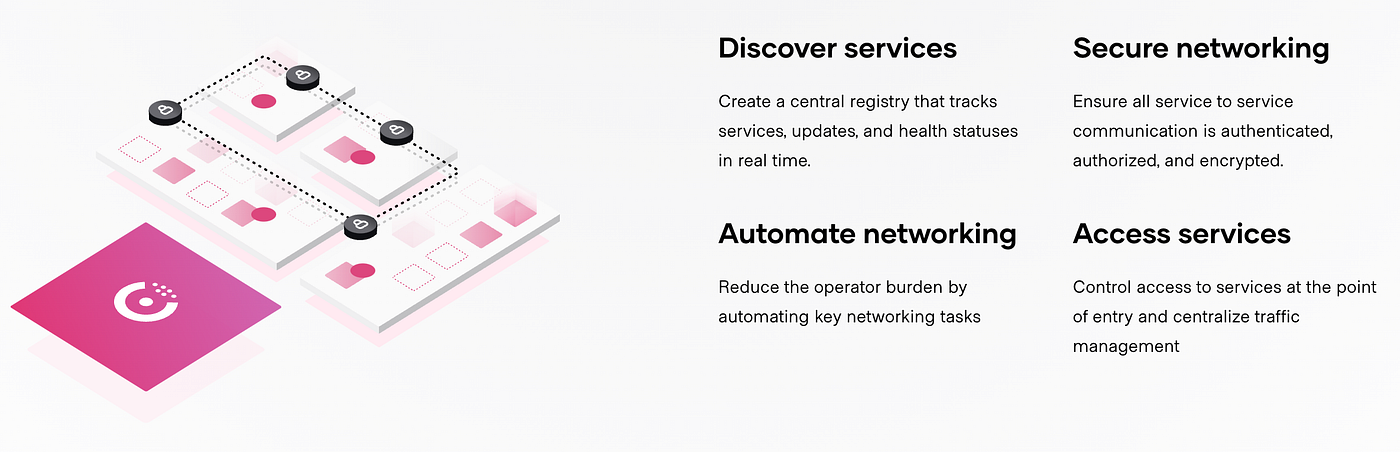
Discover Services: Need to have all these services discovered within different teams, across different teams, across different networks and regions. We need to ask ourselves. How do we locate them? How do we connect to them? How do we know if they’re healthy?
Secure Networking : How do we allow my services to connect in a secure manner to ensure they are Authenticated, Authorized, and Encrypted automatically and consistently without over-burdening every apps team.
Automate Networking: Are my service immediately available and scalable without intervention? If my app auto-scale up in reaction to high demand, do I need to go through manual ticketing processes to open up firewall/LB? What about scaling down to close the FW/LB?
Access Access: How do we control the flow of traffic in/out of my network? How can we route traffic to the appropriate services into and out of my network.
How to Achieve these Pillars Service Networking
To achieve these pillars of service networking we use #HashiCorp Consul Enterprise. Consul provides the foundational capability of service discovery and service identity in your network.
This is important because we want to move away from the concept of an IP address as the identity. IPs represent the location of where your services is running and IPs are ephemeral. We need an identity that is tied to the actual service, not WHERE the service is located.
When we start a new service it gets registered and discovered. The identity is established, using mTLS to provide secure service-to-service communication which builds our Consul’s service mesh.
Consul Provides the following additional features:
Layer 7 traffic shaping, observability, better resilience
ACLs, Namespaces, Admin Partitions that provide better governance.
Provide API GW to help manage and control traffic in/out of the service me
Network Infrastructure Automation (NIA) to automate network devices when your services change/scale.
And the key thing here is that Consul runs on any cloud and any run-time.
To learn more about Consul check out this video https://www.youtube.com/watch?v=C3N4i1cFIZ0
Consul-Terraform-Sync
Consul-Terraform-Sync (CTS) allows for the definition of tasks as Terraform modules that can be run as services are added or removed from Consul.
CTS is part of the Network Infrastructure Automation (NIA) solution which focuses on automating day network tasks such as updating or creating load balancer configurations or firewall policies. With the power of Terraform you can create custom tasks to automate other activities too.
Remember that network infrastructure is not inherently dynamic and most organizations still rely on ticketing systems for things like updating load balancer pools or applying firewall policies to new applications.
This bottleneck is also a strain on network teams who are spending more and more time fulfilling ticket requests instead of focusing elsewhere on the business.
Network infrastructure automation is the process of eliminating the need for these ticket queues and optimizing existing network architectures.
Improved productivity — letting network operators focus on other areas of the business instead of fielding tickets
Reducing cost — optimizing existing infrastructure to handle large microservice deployments and reducing costs from unplanned downtime
Click here to learn more
F5 BIGIP with AS3
F5 BIG-IP and HashiCorp Consul help enterprises automate the service discovery process through an integration with the F5 Application Services 3 Extension (AS3).
I will be deploying a BIG-IP VE in my VMware ESXI Environment. I used Terraform Cloud and BIG-IP Declarative on-boarding to automatically provision and configure my F5 BIG-IP. Take a look at the steps here
Guide to build your Demo environment
The following code builds Consul Service Networking — Network Automation Infrastructure environment that automatically builds F5 configurations based on what the app team has registered with the service mesh.
Prerequisites
You will require the following access to make this lab work
AWS access
Terraform Installed
Deploy the demo environment using Terraform
The tutorial provides an example scenario that can be deployed on AWS using Terraform.
git clone https://github.com/maniak-academy/medium-conusl-f5-hyperautomation.git
For this demo we need to configure AWS credentials for your environment so that Terraform can authenticate with AWS and create resources. To do this with IAM user authentication, set your AWS access key ID as an environment variable.
export AWS_ACCESS_KEY_ID="<YOUR_AWS_ACCESS_KEY_ID>"
Now set your secret key.
export AWS_SECRET_ACCESS_KEY="<YOUR_AWS_SECRET_ACCESS_KEY>"
Deploy Consul datacenter and F5 BIG-IP
The Terraform code for deploying the Consul datacenter and the BIG-IP instance is under the root folder.
Use the terraform.tfvars.example template file to create a terraform.tfvars file. The example file is in the terraform folder.
Edit the file to specify a prefix for the resources being created and an IP address to access the environment once deployed.
#prefix prefix = "your-prefix"# IP address to allow traffic from
# recommended to use a /32 (single IP address)allow_from = "192.0.2.0/32"# environment options# region = "us-east-1"
# f5_ami_search_name = "F5 BIGIP-16.1.2* PAYG-Good 25Mbps*"
# f5_username = "bigipuser"
Once the configuration is complete, you can deploy the infrastructure with Terraform.
First, initialize Terraform.
terraform init
Then, use terraform plan to check the resources that are going to be created.
terraform init
Finally, apply the changes.
terraform apply -auto-approve
Here are the outputs
Apply complete! Resources: 27 added, 0 changed, 0 destroyed.Outputs:Consul_SSH = "ssh -i terraform-20220513161032519200000001.pem ubuntu@54.197.55.193"
Consul_UI = "http://54.197.55.193:8500"
Copy-CTS-Config = "scp -i terraform-20220513161032519200000001.pem cts-config/cts-config.hcl ubuntu@54.197.55.193:/home/ubuntu/"
F5_Password = "76JfmNGKSXDBW9Bh"
F5_UI = "https://44.205.27.212:8443"
F5_Username = "admin"
F5_ssh = "ssh -i terraform-20220513161032519200000001.pem admin@44.205.27.212"
The final part of the Terraform output provides you with the information to access your infrastructure.
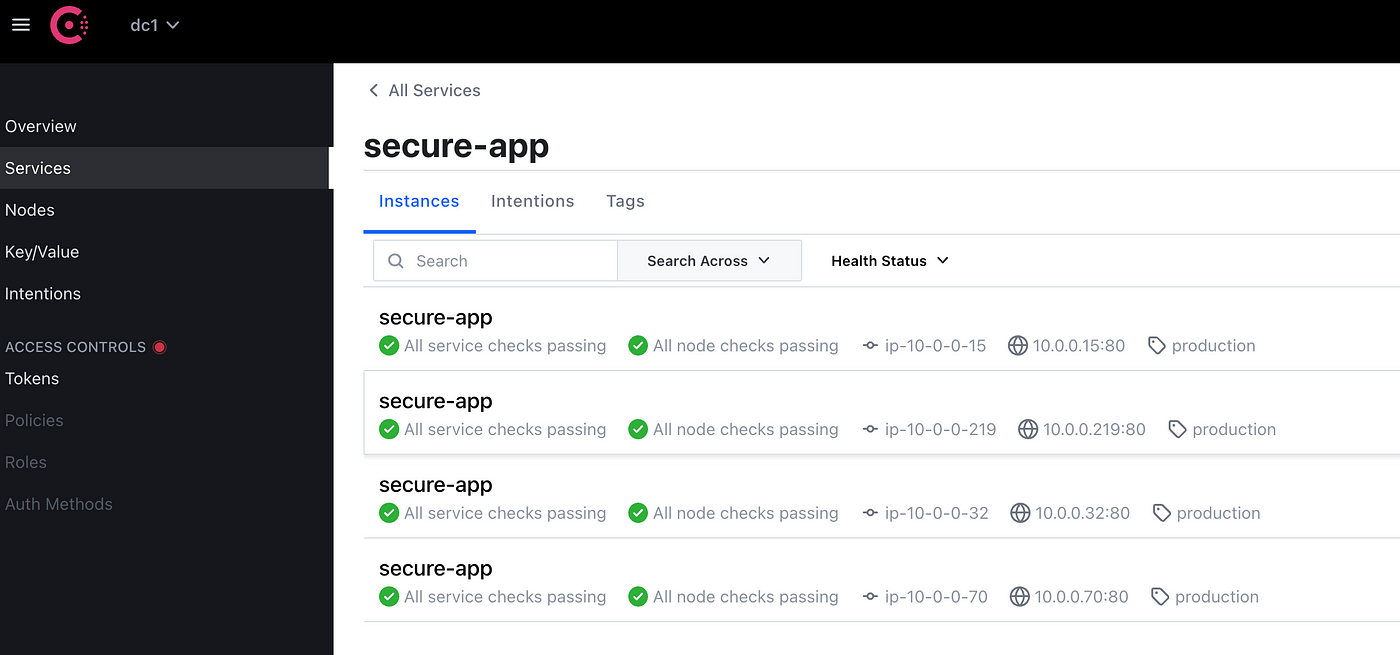
From the Consul UI you can verify the datacenter contains two instances of webapps running on two different nodes.

Note the Metadata, this is the following code in the webapp that allows the services to be registered into consul
service {
  id      = "secure-app"
  name    = "secure-app"
  tags    = ["production"]
  address = "${ip}"
  port    = 80
  meta = {
    VSIP = "10.0.0.200"
    VSPORT = "443"
    AS3TMPL = "https"
  }
  check {
    id       = "secure-app"
    name     = "TCP on port 80"
    tcp      = "${ip}:80"
    interval = "10s"
    timeout  = "1s"
  }
}
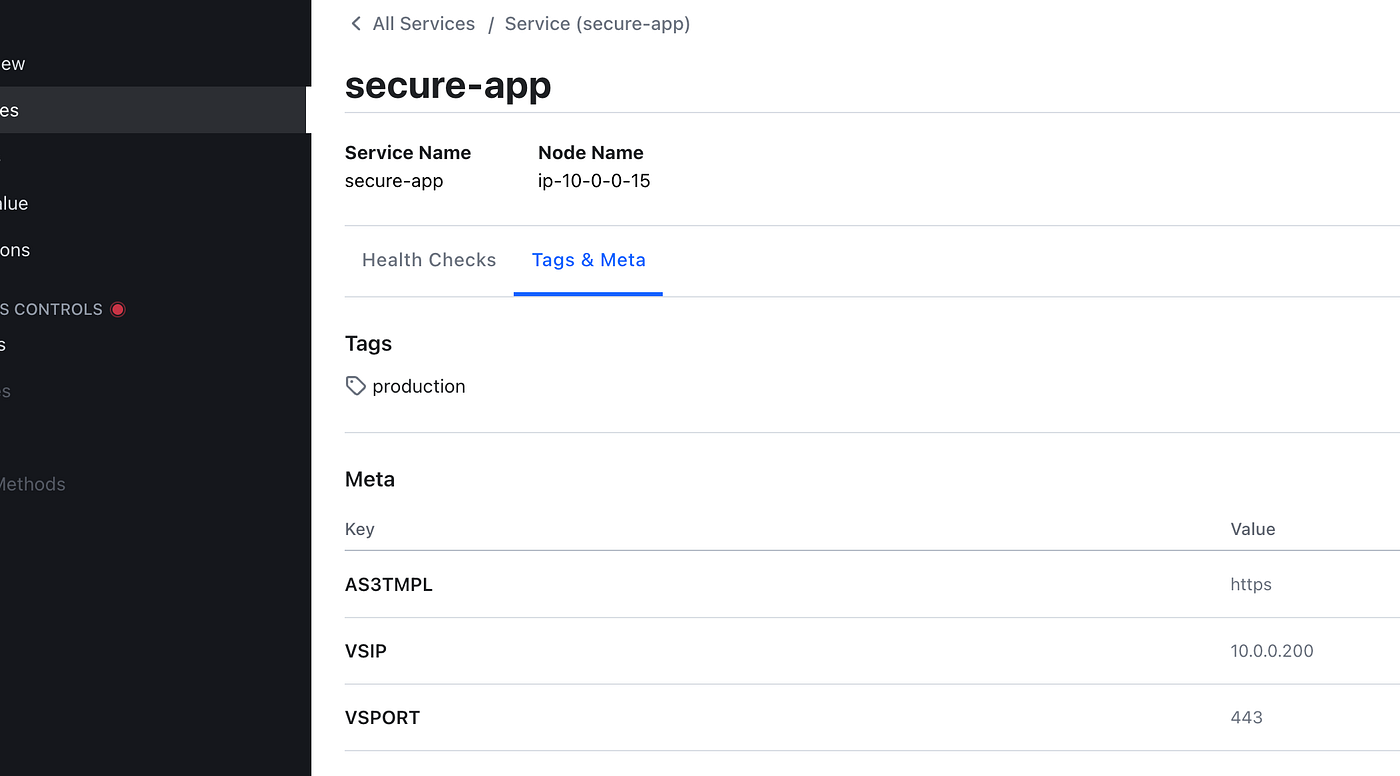
The Tags and Meta section outlines which F5 AS3 template we are going to use and what the IP and Port of the virtual server its going to build.
By opening your browser at the URL specified by the F5_UI variable, you can access your F5 BIG-IP instance GUI.
After the device finishes booting, use the F5_Username and F5_Password values to login.
Network Infrastructure Automation
With all the components installed, you can now start Consul-Terraform-Sync to automatically provision the F5 BIG-IP configuration to load balance the webapps based on the metadata in Consul.
First, let's SCP the cts-config.hcl file that was generated to our consul server.
scp -i terraform-20220513161032519200000001.pem cts-config/cts-config.hcl ubuntu@54.197.55.193:/home/ubuntu/
Now let’s log into our consul server to start consul-terraform-sync. The outcome will be the full deployment of an F5 Application.
sudo consul-terraform-sync start -config-file cts-config.hcl
Validate
Log into the F5 BIGIP and take a look at the virtual server and objects it

Test our Automation
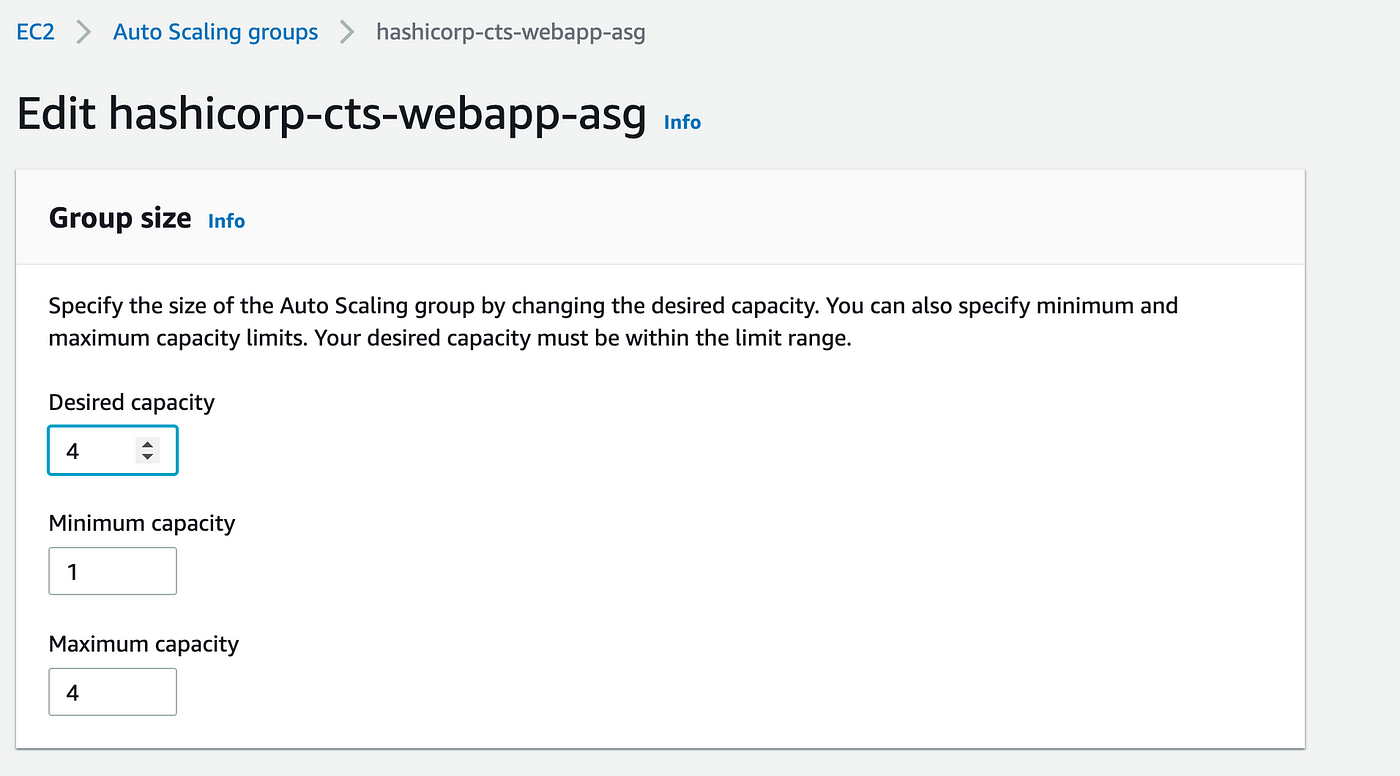
To verify the integration is working, add more webapp instances by editing the AWS Auto Scaling group configuration.
Option 1: Edit the webapp.tf file inside the terraform folder to change the desired capacity from 2 to 4.
resource "aws_autoscaling_group" "nginx" {
  name                 = "${var.prefix}-nginx-asg"
  launch_configuration = aws_launch_configuration.nginx.name
  desired_capacity     = 4
  min_size             = 1
  max_size             = 4
  vpc_zone_identifier  = [module.vpc.public_subnets[0]]  lifecycle {
    create_before_destroy = true
  }...
Then, use terraform plan to check the resources that are going to be changed.
terraform plan
Finally, apply the changes.
terraform apply -auto-approve
Option 2: Logs into the AWS Console and change the auto scaling group to 4
Once the changes are applied on AWS, Consul will show the new instances on the Services tab.
Consul-Terraform-Sync will pick the change from the Consul catalog and modify the BIG-IP configuration to reflect the new webapp instances.
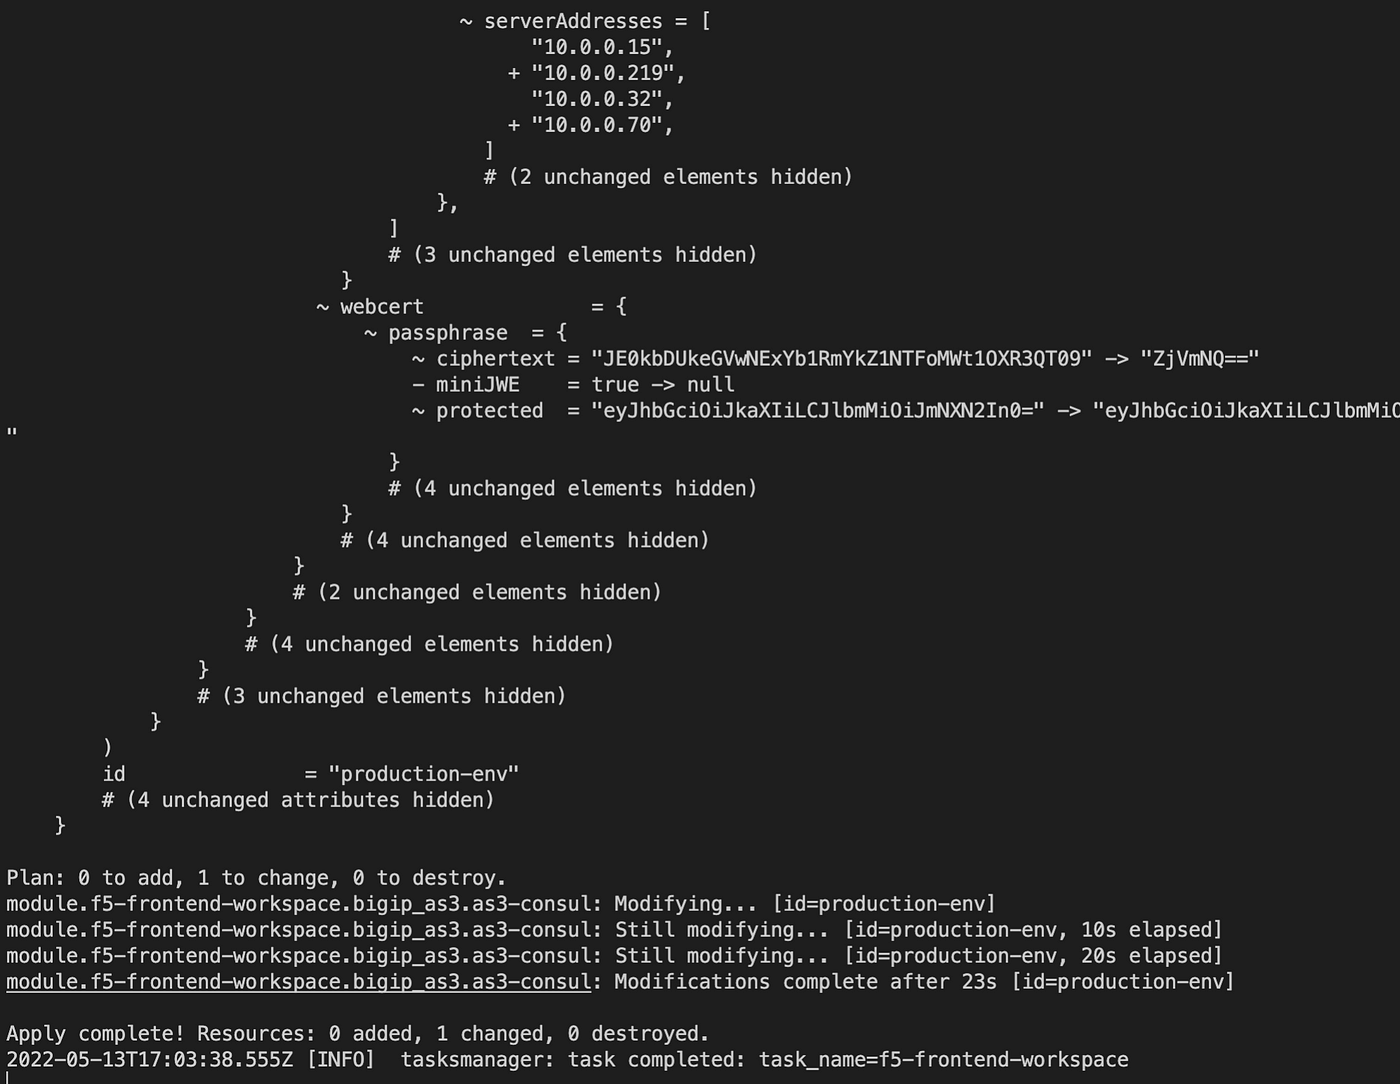
Output of consul-terraform-sync

F5 Configuration
#Hyper Automation
Clean your environment
When you are done, you can stop Consul-Terraform-Sync by either using CTRL+C in the shell running the daemon or by sending the SIGINT signal to the process.
Destroy the terraform resources
terraform destroy -auto-approve
Shoutout
Thanks to Eric Chen from F5 and Nathan Pearce for doing the heavy lifting in building out some of the code that I used for this demo.